Laser Curtains & Barriers for Laser Controlled Areas: Best Practices
How to Properly Set Up Barriers and Curtains in a Laser Controlled Area
A laser curtain can look deceptively simple. Hang the material from a frame, close the opening, and the laser area appears contained.
Real protection depends on far more than coverage. The curtain must be rated for the laser’s wavelength and output, positioned around the actual hazard, installed without vulnerable gaps, and kept clear of fire-protection and emergency-egress systems. A curtain that works well for a low-power visible laser may fail quickly when exposed to a focused Class 4 infrared beam.
Proper laser safety barrier setup begins with a hazard analysis. From there, the Laser Safety Officer can choose a protective material, define the controlled boundary, establish entry procedures, and verify that radiation outside the barrier remains at or below the applicable exposure limit.
What Is a Laser Controlled Area?
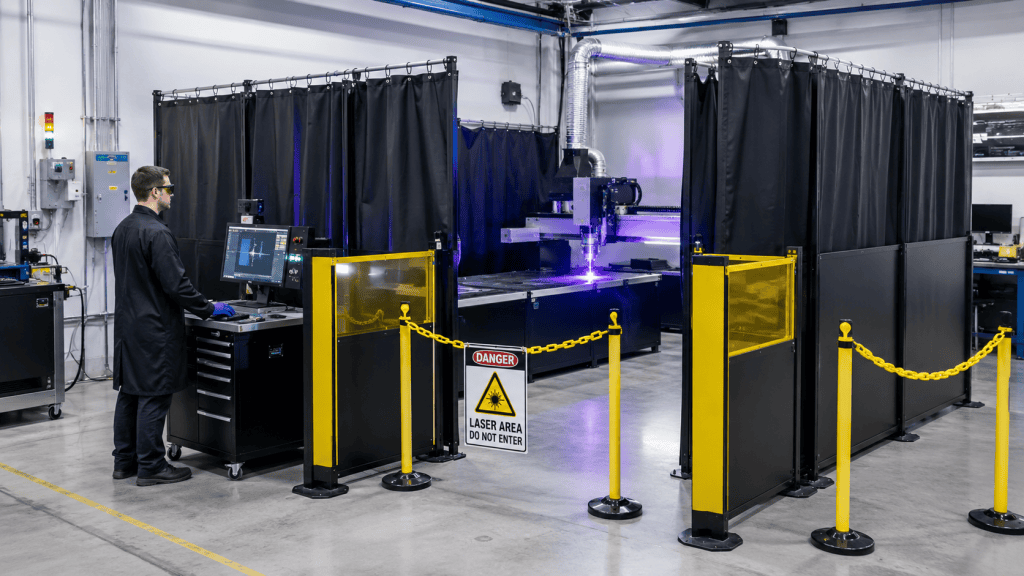
A Laser Controlled Area, or LCA, is an area where occupancy and activity are supervised because potentially hazardous laser radiation may be present. Walls, fixed panels, screens, laser curtains, or a combination of these controls can define the area.
The LCA is closely related to the Nominal Hazard Zone, or NHZ. The NHZ is the space where direct, reflected, or scattered laser radiation may exceed the applicable Maximum Permissible Exposure, commonly called the MPE. Exposure beyond the NHZ boundary should remain below that limit. (Office of Research Services)
These terms describe different parts of the safety plan:
- The NHZ describes the optical hazard.
- The LCA describes the area being administratively and physically controlled.
- The barrier or curtain helps prevent hazardous radiation from reaching people outside the protected boundary.
A barrier may sit outside the calculated NHZ, or it may truncate the NHZ by attenuating the beam to an acceptable level. The Laser Safety Officer should approve that decision.
Start With a Laser Hazard Analysis
Curtain selection should never begin with color, size, or price. Begin with the laser.
OSHA’s laser safety guidance identifies several factors used to evaluate the NHZ, including laser power or energy, beam diameter, divergence, wavelength, optics, beam path, pulse characteristics, and maximum anticipated exposure duration. The LSO is responsible for evaluating these hazards and making sure the appropriate controls are in place. (OSHA)
Collect the following information before purchasing or installing a laser safety curtain:
| Laser or Application Detail | Why It Matters |
|---|---|
| Wavelength or wavelength range | Barrier materials absorb and transmit different wavelengths differently |
| Continuous-wave or pulsed operation | Short pulses can create very high peak irradiance |
| Maximum accessible power or pulse energy | Determines the potential load on the barrier |
| Beam diameter at the barrier | A tightly focused beam creates greater irradiance than a larger beam |
| Expected exposure time | Barrier ratings apply for defined exposure periods |
| Direct, specular, or diffuse exposure | Each exposure condition places a different demand on the material |
| Beam motion | A scanning beam and a stationary beam heat a barrier differently |
| Distance from the focal point | Irradiance may rise sharply near a focus |
| Number of wavelengths | Every hazardous wavelength must be included in the selection |
| Environmental conditions | Cleanrooms, clinics, factories, and outdoor setups create different installation needs |
Use the maximum credible operating condition. A curtain selected around an average power setting may be undersized when the laser is later operated at full output.
Class 3B and Class 4 Barriers Require Different Thinking
Class 3B lasers primarily present an eye hazard through direct or mirror-like exposure. Higher-powered Class 3B systems can also create skin hazards under some conditions.
Class 4 lasers can present eye and skin hazards through direct, specular, and diffuse exposure. They can also ignite materials and generate hazardous airborne contaminants when the beam interacts with a target. (Office of Research Services)
That difference affects the barrier setup.
A Class 3B curtain may be intended to interrupt a foreseeable direct or reflected path. A Class 4 barrier may need to withstand a more demanding exposure while also limiting fire propagation and protecting people from hazardous scattered radiation.
For high-power cutting, welding, additive manufacturing, or research applications, a fixed engineered enclosure may provide more reliable protection than a flexible perimeter curtain. Curtains remain useful for entryways, temporary setups, service areas, and secondary containment.
Use Beam Enclosures and Beam Stops First
A room-sized curtain should carry the final layer of perimeter protection. Local beam controls should contain the hazard closer to its source.
Good laser control practice includes:
- Enclosing as much of the beam path as practical
- Using protective housings and interlocks
- Installing beam tubes around exposed paths
- Terminating beams with properly rated beam stops
- Using shutters or attenuators during setup
- Operating at the lowest practical power during alignment
- Keeping the beam below normal eye level where practical
- Removing unnecessary reflective objects
NIH guidance recommends enclosing beams with protective housing, interlocks, noncombustible curtains, and barriers. It also calls for noncombustible beam stops on Class 4 systems. (Office of Research Services)
Routine beam termination should occur at a beam stop designed for that purpose. A perimeter curtain then protects against foreseeable stray beams, reflections, misalignment events, and access from adjacent areas.
Select a Tested and Labeled Laser Safety Curtain
Ordinary blackout fabric, theatrical drapes, privacy curtains, plastic sheeting, and standard welding screens lack a verified laser-protective rating.
The current ANSI Z136.7-2025 standard addresses testing and labeling for laser protective equipment, including barriers, curtains, windows, and other protective materials. Testing depends on the laser wavelength, temporal mode, equipment type, and material construction. (ANSI Webstore)
Ask the barrier supplier for documentation identifying:
- Protected wavelength or wavelength band
- Laser operating mode covered by the test
- Penetration threshold or barrier threshold limit
- Exposure duration associated with the rating
- Beam or exposure conditions used during testing
- Manufacturer and product identification
- Intended use and known limitations
- Cleaning, storage, and inspection instructions
- Flame-resistance or noncombustibility information
A barrier’s optical attenuation tells only part of the story. The material must also resist thermal damage and penetration for the required exposure interval. A material with high optical density may still burn through when a concentrated beam remains on one spot.
Many institutional laser safety programs also require curtain materials to meet flame-propagation criteria such as NFPA 701 or to be noncombustible.
Choose the Right Barrier Configuration
Laser barriers generally fall into four practical categories.
Fixed Rigid Panels
Rigid panels work well for permanent installations, high-power systems, and areas where a flexible curtain could move or become damaged. They can also support interlocks, protective windows, warning lights, and fixed access doors.
Flexible Laser Curtains
Laser-rated curtains are useful for dividing rooms, surrounding medical treatment areas, controlling entryways, and accommodating changing equipment layouts. Their flexibility also creates a need for careful anchoring, overlap, and inspection.
Portable Laser Safety Screens
Portable panels work well during maintenance, alignment, demonstrations, and temporary research setups. Their bases must remain stable, and any casters should be locked during laser operation.
Laser-Rated Viewing Windows
A viewing window can allow observation from outside the controlled area. Its wavelength range and protective rating must match the laser system. An ordinary tinted window offers no reliable basis for laser protection.
How to Position Laser Safety Curtains
The final layout should block every reasonably foreseeable path through which hazardous radiation could leave the controlled area.
Map the Full Beam Path
Trace the intended beam from the aperture through every optic, sample, workpiece, and beam stop. Include possible paths created by:
- A removed optic
- A loose mirror
- An incorrectly rotated mount
- A reflective tool
- An open enclosure panel
- A changed sample height
- A moved treatment handpiece
- A tipped or misaligned component
Consider standing, seated, crouched, and elevated viewing positions. A safe-looking setup from one angle may expose a direct line of sight from another.
Place the Barrier Beyond the Foreseeable Hazard
Barrier position affects the irradiance reaching the material. Moving a curtain farther from a beam focus may increase the beam diameter and reduce the energy per unit area.
There is no universal safe distance. The LSO should compare the expected exposure at the proposed barrier location with the manufacturer’s tested threshold and exposure conditions.
Avoid placing flexible curtain material directly against hot equipment, sharp edges, moving machinery, or a location where routine operations are likely to place the primary beam on it.
Cover Windows, Doors, and Open Portals
Windows, doorways, pass-throughs, observation ports, and other openings should be covered, filtered, or restricted when hazardous radiation could reach them. Stanford’s laser safety guidance requires these openings in Class 3B and Class 4 areas to reduce transmitted radiation to the applicable ocular MPE or below. (Stanford Environmental Health & Safety)
Remember to check:
- Windows above the laser table
- Gaps around doors
- Interior observation windows
- Open ceiling penetrations
- Pass-through cabinets
- Shared wall openings
- Reflective glass surfaces
- Floor-level service openings
Invisible ultraviolet and infrared beams deserve the same attention as visible beams.
Eliminate Gaps at Seams, Corners, and Entrances
Curtain seams are common failure points.
Where two panels meet, overlap them instead of allowing the edges to touch. A six-inch overlap is a practical benchmark used in the University of Michigan’s laser safety guideline, although the LSO or curtain manufacturer may specify a greater overlap for a particular setup.
At corners, return one panel behind the next panel so a diagonal line of sight cannot pass through the joint.
At entryways, use one of these arrangements:
- A heavily overlapped split curtain
- An offset entrance
- A two-panel dog-leg entrance
- A short vestibule
- A rigid door with an interlock
- A barrier positioned inside the doorway
A dog-leg entrance is often useful because someone opening the outer panel still lacks a direct view of the laser beam path.
Any split in the curtain should face away from the laser and its likely reflection paths.
Secure the Barrier Against Movement
HVAC airflow, foot traffic, rolling carts, medical equipment, and normal room activity can move a poorly secured curtain.
Depending on the approved product, secure the curtain with:
- A rigid ceiling or wall track
- A stable freestanding frame
- Weighted hems
- Floor anchors
- Approved magnetic retainers
- Side fasteners
- Interlocking curtain panels
- Wheel locks on portable frames
Keep the lower edge controlled when a hazardous beam could pass beneath it. A small floor gap may be acceptable when the hazard analysis shows that radiation cannot reach the gap and the opening supports ventilation or cleaning.
Do not add improvised fasteners that puncture or damage the protective material unless the manufacturer approves the modification.
Coordinate the Installation With Fire Protection
A floor-to-ceiling curtain can interfere with sprinklers, smoke detection, ventilation, and emergency lighting. Exact clearance requirements depend on the building, local fire code, curtain material, sprinkler layout, and authority having jurisdiction.
The University of Michigan’s guideline, for example, keeps curtains below the ceiling and specifies additional clearance based on the room’s sprinkler configuration. It also discourages floor-to-ceiling installation unless the application requires full light exclusion.
Before installing a large curtain enclosure:
- Review the layout with the LSO.
- Consult facility safety or fire-protection personnel.
- Confirm sprinkler coverage.
- Maintain required ceiling clearance.
- Preserve smoke-detector performance.
- Avoid trapping heat or laser-generated contaminants.
- Keep extinguishers and emergency equipment accessible.
A laser curtain controls optical radiation. Local exhaust ventilation or another appropriate control is still needed for laser-generated smoke, vapor, fumes, and particles.
Preserve Rapid Emergency Egress
A laser barrier should never trap someone inside the controlled area.
Entryway and area controls for Class 3B and Class 4 systems must allow rapid egress and emergency access. The curtain layout should keep exits, aisles, shutoff controls, fire extinguishers, and medical equipment reachable. (Stanford Environmental Health & Safety)
Check for:
- Curtain folds that create a trip hazard
- Frames narrowing an exit route
- Weighted hems crossing a walkway
- Portable panels blocking emergency controls
- Confusing routes through multiple curtain layers
- Fasteners that require tools to release
- Curtains hiding exit signs or warning lights
Employees should be able to leave quickly without entering another part of the NHZ.
Set Up Class 4 Entryway Controls
Class 4 laser controlled areas require strong entry controls. A fail-safe interlock may stop the laser when a door opens or prevent unprotected entry while the system is operating.
An alternate procedural entryway arrangement may use a blocking barrier, screen, or curtain that reduces radiation at the entrance to the MPE or below. This arrangement also requires an audible or visible indication that the Class 4 laser is operating, trained personnel, and appropriate protective equipment for anyone entering. (Stanford Environmental Health & Safety)
A complete entryway setup may include:
- A laser-rated curtain inside the doorway
- An illuminated warning sign
- A flashing light visible through protective eyewear
- An audible warning
- Controlled key access
- Written entry procedures
- Laser safety eyewear available before entry
- Emergency contact information
- A clearly marked shutdown control
The LSO should approve and document any alternate control used in place of an interlocked door.
Control Reflections Inside the Curtain
A curtain protects the perimeter. Reflection control reduces the chance that the barrier will ever receive a hazardous beam.
Inside the controlled area:
- Use matte, anodized, or diffusely reflecting hardware where practical.
- Remove or cover reflective jewelry.
- Secure mirrors and optical mounts.
- Keep unnecessary tools away from the beam.
- Use beam blocks during alignment.
- Cover reflective windows and displays.
- Position optics below normal eye level where practical.
- Keep the table organized.
- Document alignment procedures.
NIH’s laser safety SOP specifically checks for covered windows, matte or nonreflective instruments, removal of reflective jewelry, controlled access, rapid egress, barriers, beam stops, warning signs, and operational warning systems. (Office of Research Services)
Commission the Barrier Before Routine Operation
Installation is complete after the setup has been evaluated and approved.
A practical commissioning process includes:
- Verify the curtain label. Confirm that its wavelength, threshold, operating mode, and exposure-time rating match the hazard analysis.
- Inspect the entire perimeter. Look for gaps, pinholes, seams, uncovered windows, and diagonal lines of sight.
- Confirm frame stability. Lock wheels, secure panels, and test the effect of normal airflow.
- Check entry controls. Test warning lights, audible indicators, interlocks, and shutdown devices.
- Review fire and egress conditions. Confirm sprinkler clearance and exit access.
- Validate the protected boundary. Use calculations, approved measurement methods, or both to confirm that exposure outside the barrier remains at or below the MPE.
- Update the SOP. Record the curtain model, rating, layout, inspection process, and entry procedure.
- Train affected personnel. Everyone should understand what the boundary means and what to do when a problem is found.
Field-testing a curtain by deliberately striking it with a full-power beam can damage the material and create an uncontrolled exposure. Any destructive or high-power acceptance test should follow a procedure approved by the LSO and manufacturer.
Inspect Laser Curtains Before Use
Flexible barriers experience wear. They are folded, moved, cleaned, bumped by equipment, and occasionally exposed to stray radiation.
A pre-use laser safety curtain inspection should check for:
- Cuts or punctures
- Burn marks
- Discoloration
- Blistering or delamination
- Damaged seams
- Missing labels
- Unsecured panels
- Open overlaps
- Bent or unstable frames
- Unlocked casters
- New gaps around equipment
- Blocked exits
- Obstructed warning signs
- Changes to the laser or optical path
Replace or remove the curtain from service when damage could affect its performance, the rating label becomes unreadable, its history is uncertain, or the laser has changed beyond the product’s approved conditions.
Cleaning should follow the manufacturer’s instructions. Aggressive solvents, abrasion, or unapproved repairs may affect coatings, seams, and flame-resistance properties.
Review the Setup Whenever the Laser Changes
A barrier approved for the original system may become inadequate after a seemingly modest change.
Repeat the hazard review when:
- A higher-power laser is installed
- A new wavelength is added
- Pulse duration or repetition rate changes
- The beam is focused more tightly
- An optic changes the beam diameter or direction
- A scanner is added
- The laser table is moved
- A treatment room is rearranged
- An enclosure is removed
- Alignment procedures change
- A near miss occurs
- The curtain is relocated
OSHA’s technical guidance assigns the LSO responsibility for NHZ evaluation, barrier controls, SOP approval, signs, PPE, facility controls, and training. (OSHA)
Common Laser Curtain Setup Mistakes
| Mistake | Why It Creates Risk |
|---|---|
| Choosing a curtain by color | Visual appearance says nothing reliable about wavelength protection or penetration resistance |
| Using blackout fabric | Light-blocking performance does not establish laser or fire protection |
| Using a welding curtain | Welding-screen ratings address different hazards |
| Placing the curtain at the beam focus | The smaller beam can produce much higher irradiance |
| Allowing panels to meet without overlap | Movement can open a direct path through the seam |
| Leaving an entrance facing the beam | Opening the curtain may expose an entrant immediately |
| Ignoring invisible wavelengths | A curtain may block visible light while transmitting UV or infrared energy |
| Relying on the curtain as the routine beam stop | Repeated exposure can damage or penetrate flexible material |
| Blocking sprinklers or exits | The optical control can introduce a fire or evacuation hazard |
| Skipping inspections | Small punctures, burns, or moved panels may remain unnoticed |
| Assuming the curtain controls plume | Radiation barriers do not provide local exhaust ventilation |
| Reusing a curtain with a different laser | The original wavelength and exposure rating may no longer apply |
Training Operators and Laser Safety Officers
Operators need enough training to understand:
- Where the controlled area begins
- When the curtain must be closed
- How to enter safely
- Which warning indicators apply
- What damage looks like
- How to report a problem
- Where eyewear is required
- How to shut down the laser during an emergency
LaserSafetyCertification.com offers foundational laser safety certification courses for operators and technicians working in industrial, laboratory, medical, cosmetic, and veterinary environments.
The LSO needs deeper knowledge of hazard classification, MPEs, NHZ calculations, control selection, barrier approval, warning systems, SOPs, inspections, and incident response. Facilities preparing someone for this responsibility can review the available Laser Safety Officer certification courses.
Course completion supports training documentation. The facility’s hazard analysis, equipment-specific procedures, and LSO approval complete the site-specific safety process.
Frequently Asked Questions
Can any flame-resistant curtain be used as a laser barrier?
Flame resistance addresses combustion behavior. Laser protection also requires tested performance at the applicable wavelength, operating mode, irradiance or radiant exposure, beam conditions, and exposure duration.
How far should a laser curtain be from the beam?
No single distance works for every system. The correct position depends on beam diameter, divergence, focus, power or pulse energy, exposure time, and the curtain’s tested threshold.
Should a laser safety curtain extend from floor to ceiling?
The barrier should close every hazardous optical path. Fire protection, ventilation, sprinklers, smoke detection, and emergency egress also affect the layout. Full-height installation requires facility and LSO review.
Do workers inside the curtain still need laser safety eyewear?
Workers inside the NHZ may require wavelength-specific laser safety eyewear based on the hazard analysis and SOP. The perimeter curtain protects people outside the controlled boundary.
Can a laser curtain replace a door interlock?
A Class 4 entryway may use an approved alternate control involving a blocking barrier, operational warning, trained entry procedures, and PPE. The LSO should evaluate and document that arrangement.
Is a blackout curtain suitable for laser work?
Commercial blackout fabric is designed to reduce ordinary light. Use a documented laser-rated product whenever hazardous laser radiation could reach the material.
How often should laser curtains be inspected?
Inspect them before use and at the interval defined by the facility’s SOP. Additional inspections should follow relocation, beam-path changes, accidental exposure, equipment modification, or any event that could damage the barrier.
Building a Dependable Laser Controlled Area
A well-designed laser controlled area works as a system.
Protective housings contain the source. Beam tubes control the path. Beam stops terminate the beam. Curtains and barriers protect the perimeter. Warning systems control entry. Eyewear protects trained personnel who must work within the NHZ. Procedures and inspections keep every layer working together.
The Laser Safety Officer should approve the hazard analysis, barrier rating, physical layout, entry controls, warning systems, and inspection process before routine operation begins.
For foundational operator and technician education, review the laser safety certification options. For personnel responsible for evaluating hazards and managing the facility’s laser safety program, explore LSO certification training.